# Intermediate Guide: Weather Widget
This is a quick tutorial for creating the Weather Widget example using motion tokens.
You can access the Codepen example here: [https://codepen.io/George-Dikun/pen/pvbqVVB](https://codepen.io/George-Dikun/pen/pvbqVVB)
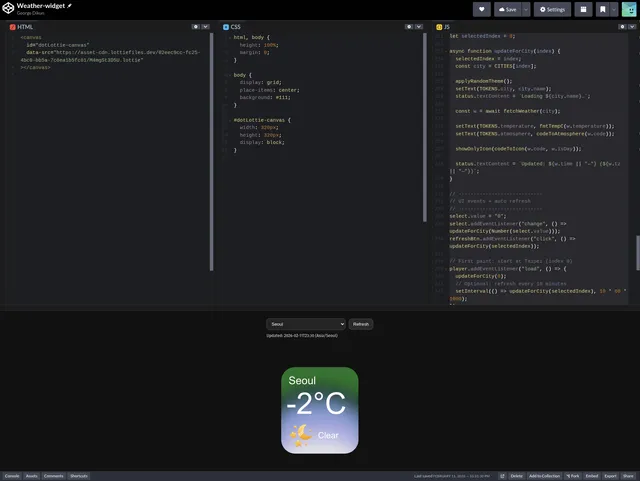
The widget displays dynamic info for the city, temperature, weather type, and an animated icon of the weather type. The background changes to give a unique feel to each city choice.
It also has a simple UI for changing the location to demo it. The weather data is actually real and pulls from a publicly-accessible API.
## Creating the File
Before you begin using your motion tokens in code, you first need to create a file that uses motion tokens.
Here is the remix link of the weather widget animation in Lottie Creator: [https://lottie.link/weatherwidget](https://lottie.link/weatherwidget)
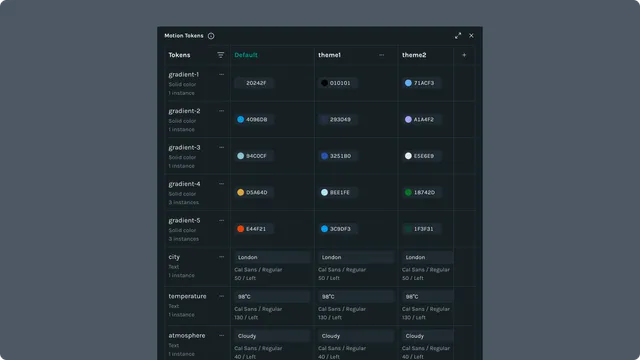
Once inside Creator, you can see the current tokens by opening the Motion Tokens manager.
This one has a lot going on, so let’s try to break it down.
- At the top, there are opacity tokens for each of the possible weather icons (icon-rain, icon-snow, etc.). These are selectively made visible depending on the type of weather that is being shown. If the weather is rainy, then we can write code later to make the rain cloud animation visible and keep all the others invisible. These animations just play on a loop concurrently.
- Near the middle, there are three text tokens named temperature, atmosphere, and city. These are fairly straightforward; they are text placeholders to be updated in code.
- At the bottom, there are a number of color tokens that are being used as gradients. Lottie Creator does actually support gradient tokens, but they are not used here due to a specific design choice.
## Vibe Coding with ChatGPT
The logic in this project is more complex than the birthday cake example, but still straightforward for developers or AI.
Before we wrote the prompt, we first did a bit of exploration using ChatGPT and Codepen to find a way to get the user’s real weather data at their location. There are several public API that can be added to your project.
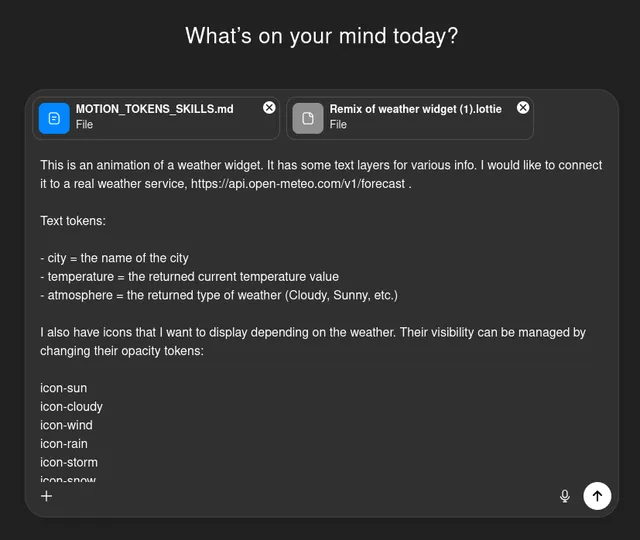
The prompt we used was:
This is an animation of a weather widget. It has some text layers for various info. I would like to connect it to a real weather service, [https://api.open-meteo.com/v1/forecast](https://api.open-meteo.com/v1/forecast) .
Text tokens:
- city = the name of the city
- temperature = the returned current temperature value
- atmosphere = the returned type of weather (Cloudy, Sunny, etc.)
I also have icons that I want to display depending on the weather. Their visibility can be managed by changing their opacity tokens:
icon-sun
icon-cloudy
icon-wind
icon-rain
icon-storm
icon-snow
icon-snowstorm
icon-night
Here’s some functions written by ChatGPT to help turn weather API data into icons and atmosphere text:
```javascript
function codeToAtmosphere(code) {
if (code === 0) return "Clear";
if (code <= 2) return "Cloudy";
if (code === 3) return "Overcast";
if (code === 45 || code === 48) return "Fog";
if (code >= 51 && code <= 67) return "Rain";
if (code >= 71 && code <= 77) return "Snow";
if (code >= 80 && code <= 82) return "Rain";
if (code >= 85 && code <= 86) return "Snow";
if (code >= 95) return "Storm";
return "Weather";
}
function codeToIcon(code, isDay) {
if (!isDay && code <= 3) return TOKENS.iconNight;
if (code === 0) return TOKENS.iconSun;
if (code <= 3) return TOKENS.iconCloudy;
if (code === 45 || code === 48) return TOKENS.iconWind;
if (code >= 51 && code <= 82) return TOKENS.iconRain;
if (code >= 71 && code <= 77) return TOKENS.iconSnow;
if (code >= 85 && code <= 86) return TOKENS.iconSnowstorm;
if (code >= 95) return TOKENS.iconStorm;
return TOKENS.iconCloudy;
}
```
This is how to select an icon to have 100% opacity or 0% opacity.
There is also a set of color tokens for the backrgound gradient colors. The possible values are stored in the themes. Choose a random set each time it updates the city.
Finally, make a UI that allows choosing from 8 different cities.
Make sure to include the dotLottie file and the skills document!
Here’s the code from the output:
```jsx
import { DotLottie } from "https://esm.sh/@lottiefiles/dotlottie-web@latest";
// ----------------------------
// Tokens in your animation
// ----------------------------
const TOKENS = {
city: "city",
temperature: "temperature",
atmosphere: "atmosphere",
iconSun: "icon-sun",
iconCloudy: "icon-cloudy",
iconWind: "icon-wind",
iconRain: "icon-rain",
iconStorm: "icon-storm",
iconSnow: "icon-snow",
iconSnowstorm: "icon-snowstorm",
iconNight: "icon-night",
};
const ICON_TOKENS = [
TOKENS.iconSun,
TOKENS.iconCloudy,
TOKENS.iconWind,
TOKENS.iconRain,
TOKENS.iconStorm,
TOKENS.iconSnow,
TOKENS.iconSnowstorm,
TOKENS.iconNight,
];
// ----------------------------
// City presets (8 options)
// ----------------------------
const CITIES = [
{ name: "Taipei", lat: 25.0330, lon: 121.5654 },
{ name: "Tokyo", lat: 35.6762, lon: 139.6503 },
{ name: "Seoul", lat: 37.5665, lon: 126.9780 },
{ name: "Singapore", lat: 1.3521, lon: 103.8198 },
{ name: "Sydney", lat: -33.8688, lon: 151.2093 },
{ name: "London", lat: 51.5074, lon: -0.1278 },
{ name: "New York", lat: 40.7128, lon: -74.0060 },
{ name: "San Francisco", lat: 37.7749, lon: -122.4194 },
];
// ----------------------------
// Open-Meteo mapping helpers (your provided logic)
// ----------------------------
function codeToAtmosphere(code) {
if (code === 0) return "Clear";
if (code <= 2) return "Cloudy";
if (code === 3) return "Overcast";
if (code === 45 || code === 48) return "Fog";
if (code >= 51 && code <= 67) return "Rain";
if (code >= 71 && code <= 77) return "Snow";
if (code >= 80 && code <= 82) return "Rain";
if (code >= 85 && code <= 86) return "Snow";
if (code >= 95) return "Storm";
return "Weather";
}
function codeToIcon(code, isDay) {
if (!isDay && code <= 3) return TOKENS.iconNight;
if (code === 0) return TOKENS.iconSun;
if (code <= 3) return TOKENS.iconCloudy;
if (code === 45 || code === 48) return TOKENS.iconWind;
if (code >= 51 && code <= 82) return TOKENS.iconRain;
if (code >= 71 && code <= 77) return TOKENS.iconSnow;
if (code >= 85 && code <= 86) return TOKENS.iconSnowstorm;
if (code >= 95) return TOKENS.iconStorm;
return TOKENS.iconCloudy;
}
// ----------------------------
// dotLottie setup
// ----------------------------
const canvas = document.getElementById("dotLottie-canvas");
const SRC = canvas.dataset.src;
const player = new DotLottie({
canvas,
src: SRC,
autoplay: true,
loop: true,
renderConfig: { autoResize: true },
});
// ----------------------------
// UI
// ----------------------------
const ui = document.createElement("div");
ui.style.display = "grid";
ui.style.gap = "10px";
ui.style.marginBottom = "12px";
ui.style.fontFamily = "system-ui, -apple-system, Segoe UI, Roboto, Arial";
ui.style.color = "#fff";
ui.style.width = "320px";
const row = document.createElement("div");
row.style.display = "grid";
row.style.gridTemplateColumns = "1fr auto";
row.style.gap = "10px";
row.style.alignItems = "center";
const select = document.createElement("select");
select.style.padding = "8px 10px";
select.style.borderRadius = "10px";
select.style.border = "1px solid rgba(255,255,255,0.2)";
select.style.background = "rgba(255,255,255,0.08)";
select.style.color = "#fff";
select.style.outline = "none";
CITIES.forEach((c, idx) => {
const opt = document.createElement("option");
opt.value = String(idx);
opt.textContent = c.name;
select.appendChild(opt);
});
const refreshBtn = document.createElement("button");
refreshBtn.textContent = "Refresh";
refreshBtn.style.padding = "8px 12px";
refreshBtn.style.borderRadius = "10px";
refreshBtn.style.border = "1px solid rgba(255,255,255,0.2)";
refreshBtn.style.background = "rgba(255,255,255,0.10)";
refreshBtn.style.color = "#fff";
refreshBtn.style.cursor = "pointer";
const status = document.createElement("div");
status.style.fontSize = "12px";
status.style.opacity = "0.85";
status.textContent = "—";
row.appendChild(select);
row.appendChild(refreshBtn);
ui.appendChild(row);
ui.appendChild(status);
// Insert UI above the canvas
canvas.parentNode.insertBefore(ui, canvas);
// ----------------------------
// Theme picking (random embedded theme each city update)
// ----------------------------
function pickRandomThemeId() {
const themes = player?.manifest?.themes || [];
if (!themes.length) return null;
const t = themes[Math.floor(Math.random() * themes.length)];
return t?.id || null;
}
function applyRandomTheme() {
const themeId = pickRandomThemeId();
if (!themeId) return;
// dotlottie-web has varied theme APIs across versions;
// try the common ones.
if (typeof player.setTheme === "function") player.setTheme(themeId);
else if (typeof player.loadTheme === "function") player.loadTheme(themeId);
else if (typeof player.setThemeId === "function") player.setThemeId(themeId);
}
// ----------------------------
// Token writers
// ----------------------------
function setText(token, text) {
player.setTextSlot(token, { t: String(text) }); // partial update: only change content
}
function showOnlyIcon(tokenToShow) {
for (const t of ICON_TOKENS) {
player.setScalarSlot(t, t === tokenToShow ? 100 : 0);
}
}
function fmtTempC(v) {
// keep it clean for UI: 14°C / 23°C etc.
const n = Math.round(Number(v));
return `${n}°C`;
}
// ----------------------------
// Open-Meteo fetch
// ----------------------------
async function fetchWeather({ lat, lon }) {
const url =
`https://api.open-meteo.com/v1/forecast` +
`?latitude=${encodeURIComponent(lat)}` +
`&longitude=${encodeURIComponent(lon)}` +
`¤t=temperature_2m,weather_code,is_day` +
`&timezone=auto`;
const res = await fetch(url);
const json = await res.json();
const cur = json.current || {};
return {
temperature: cur.temperature_2m,
code: cur.weather_code,
isDay: Boolean(cur.is_day),
time: cur.time,
tz: json.timezone,
};
}
// ----------------------------
// Main update flow
// ----------------------------
let selectedIndex = 0;
async function updateForCity(index) {
selectedIndex = index;
const city = CITIES[index];
applyRandomTheme();
setText(TOKENS.city, city.name);
status.textContent = `Loading ${city.name}…`;
const w = await fetchWeather(city);
setText(TOKENS.temperature, fmtTempC(w.temperature));
setText(TOKENS.atmosphere, codeToAtmosphere(w.code));
showOnlyIcon(codeToIcon(w.code, w.isDay));
status.textContent = `Updated: ${w.time || "—"} (${w.tz || "—"})`;
}
// ----------------------------
// UI events + auto refresh
// ----------------------------
select.value = "0";
select.addEventListener("change", () => updateForCity(Number(select.value)));
refreshBtn.addEventListener("click", () => updateForCity(selectedIndex));
// First paint: start at Taipei (index 0)
player.addEventListener("load", () => {
updateForCity(0);
// Optional: refresh every 10 minutes
setInterval(() => updateForCity(selectedIndex), 10 * 60 * 1000);
});
```
Pasting that into the JS panel in Codepen (after adding my Asset CDN link to the HTLM) resulted in the working demo at the top of the article.
This prompt actually worked on the first try. Sometimes it takes a few tries, but if your prompt is descriptive and your file is constructed well, then it should be able to get you pretty far.
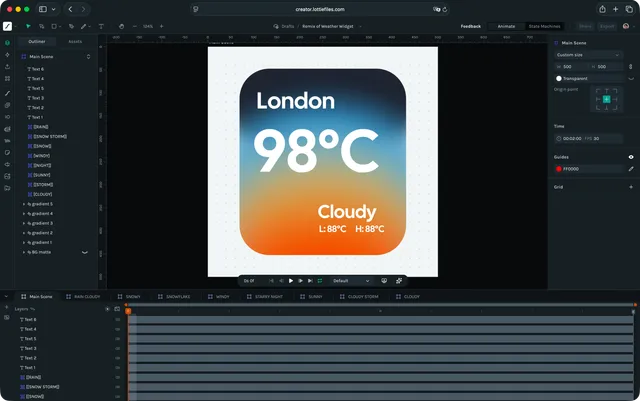 Once inside Creator, you can see the current tokens by opening the Motion Tokens manager.
 This one has a lot going on, so let’s try to break it down.
- At the top, there are opacity tokens for each of the possible weather icons (icon-rain, icon-snow, etc.). These are selectively made visible depending on the type of weather that is being shown. If the weather is rainy, then we can write code later to make the rain cloud animation visible and keep all the others invisible. These animations just play on a loop concurrently.
- Near the middle, there are three text tokens named temperature, atmosphere, and city. These are fairly straightforward; they are text placeholders to be updated in code.
- At the bottom, there are a number of color tokens that are being used as gradients. Lottie Creator does actually support gradient tokens, but they are not used here due to a specific design choice.
## Vibe Coding with ChatGPT
The logic in this project is more complex than the birthday cake example, but still straightforward for developers or AI.
Before we wrote the prompt, we first did a bit of exploration using ChatGPT and Codepen to find a way to get the user’s real weather data at their location. There are several public API that can be added to your project.
The prompt we used was:
This one has a lot going on, so let’s try to break it down.
- At the top, there are opacity tokens for each of the possible weather icons (icon-rain, icon-snow, etc.). These are selectively made visible depending on the type of weather that is being shown. If the weather is rainy, then we can write code later to make the rain cloud animation visible and keep all the others invisible. These animations just play on a loop concurrently.
- Near the middle, there are three text tokens named temperature, atmosphere, and city. These are fairly straightforward; they are text placeholders to be updated in code.
- At the bottom, there are a number of color tokens that are being used as gradients. Lottie Creator does actually support gradient tokens, but they are not used here due to a specific design choice.
## Vibe Coding with ChatGPT
The logic in this project is more complex than the birthday cake example, but still straightforward for developers or AI.
Before we wrote the prompt, we first did a bit of exploration using ChatGPT and Codepen to find a way to get the user’s real weather data at their location. There are several public API that can be added to your project.
The prompt we used was:
 Here’s the code from the output:
```jsx
import { DotLottie } from "https://esm.sh/@lottiefiles/dotlottie-web@latest";
// ----------------------------
// Tokens in your animation
// ----------------------------
const TOKENS = {
city: "city",
temperature: "temperature",
atmosphere: "atmosphere",
iconSun: "icon-sun",
iconCloudy: "icon-cloudy",
iconWind: "icon-wind",
iconRain: "icon-rain",
iconStorm: "icon-storm",
iconSnow: "icon-snow",
iconSnowstorm: "icon-snowstorm",
iconNight: "icon-night",
};
const ICON_TOKENS = [
TOKENS.iconSun,
TOKENS.iconCloudy,
TOKENS.iconWind,
TOKENS.iconRain,
TOKENS.iconStorm,
TOKENS.iconSnow,
TOKENS.iconSnowstorm,
TOKENS.iconNight,
];
// ----------------------------
// City presets (8 options)
// ----------------------------
const CITIES = [
{ name: "Taipei", lat: 25.0330, lon: 121.5654 },
{ name: "Tokyo", lat: 35.6762, lon: 139.6503 },
{ name: "Seoul", lat: 37.5665, lon: 126.9780 },
{ name: "Singapore", lat: 1.3521, lon: 103.8198 },
{ name: "Sydney", lat: -33.8688, lon: 151.2093 },
{ name: "London", lat: 51.5074, lon: -0.1278 },
{ name: "New York", lat: 40.7128, lon: -74.0060 },
{ name: "San Francisco", lat: 37.7749, lon: -122.4194 },
];
// ----------------------------
// Open-Meteo mapping helpers (your provided logic)
// ----------------------------
function codeToAtmosphere(code) {
if (code === 0) return "Clear";
if (code <= 2) return "Cloudy";
if (code === 3) return "Overcast";
if (code === 45 || code === 48) return "Fog";
if (code >= 51 && code <= 67) return "Rain";
if (code >= 71 && code <= 77) return "Snow";
if (code >= 80 && code <= 82) return "Rain";
if (code >= 85 && code <= 86) return "Snow";
if (code >= 95) return "Storm";
return "Weather";
}
function codeToIcon(code, isDay) {
if (!isDay && code <= 3) return TOKENS.iconNight;
if (code === 0) return TOKENS.iconSun;
if (code <= 3) return TOKENS.iconCloudy;
if (code === 45 || code === 48) return TOKENS.iconWind;
if (code >= 51 && code <= 82) return TOKENS.iconRain;
if (code >= 71 && code <= 77) return TOKENS.iconSnow;
if (code >= 85 && code <= 86) return TOKENS.iconSnowstorm;
if (code >= 95) return TOKENS.iconStorm;
return TOKENS.iconCloudy;
}
// ----------------------------
// dotLottie setup
// ----------------------------
const canvas = document.getElementById("dotLottie-canvas");
const SRC = canvas.dataset.src;
const player = new DotLottie({
canvas,
src: SRC,
autoplay: true,
loop: true,
renderConfig: { autoResize: true },
});
// ----------------------------
// UI
// ----------------------------
const ui = document.createElement("div");
ui.style.display = "grid";
ui.style.gap = "10px";
ui.style.marginBottom = "12px";
ui.style.fontFamily = "system-ui, -apple-system, Segoe UI, Roboto, Arial";
ui.style.color = "#fff";
ui.style.width = "320px";
const row = document.createElement("div");
row.style.display = "grid";
row.style.gridTemplateColumns = "1fr auto";
row.style.gap = "10px";
row.style.alignItems = "center";
const select = document.createElement("select");
select.style.padding = "8px 10px";
select.style.borderRadius = "10px";
select.style.border = "1px solid rgba(255,255,255,0.2)";
select.style.background = "rgba(255,255,255,0.08)";
select.style.color = "#fff";
select.style.outline = "none";
CITIES.forEach((c, idx) => {
const opt = document.createElement("option");
opt.value = String(idx);
opt.textContent = c.name;
select.appendChild(opt);
});
const refreshBtn = document.createElement("button");
refreshBtn.textContent = "Refresh";
refreshBtn.style.padding = "8px 12px";
refreshBtn.style.borderRadius = "10px";
refreshBtn.style.border = "1px solid rgba(255,255,255,0.2)";
refreshBtn.style.background = "rgba(255,255,255,0.10)";
refreshBtn.style.color = "#fff";
refreshBtn.style.cursor = "pointer";
const status = document.createElement("div");
status.style.fontSize = "12px";
status.style.opacity = "0.85";
status.textContent = "—";
row.appendChild(select);
row.appendChild(refreshBtn);
ui.appendChild(row);
ui.appendChild(status);
// Insert UI above the canvas
canvas.parentNode.insertBefore(ui, canvas);
// ----------------------------
// Theme picking (random embedded theme each city update)
// ----------------------------
function pickRandomThemeId() {
const themes = player?.manifest?.themes || [];
if (!themes.length) return null;
const t = themes[Math.floor(Math.random() * themes.length)];
return t?.id || null;
}
function applyRandomTheme() {
const themeId = pickRandomThemeId();
if (!themeId) return;
// dotlottie-web has varied theme APIs across versions;
// try the common ones.
if (typeof player.setTheme === "function") player.setTheme(themeId);
else if (typeof player.loadTheme === "function") player.loadTheme(themeId);
else if (typeof player.setThemeId === "function") player.setThemeId(themeId);
}
// ----------------------------
// Token writers
// ----------------------------
function setText(token, text) {
player.setTextSlot(token, { t: String(text) }); // partial update: only change content
}
function showOnlyIcon(tokenToShow) {
for (const t of ICON_TOKENS) {
player.setScalarSlot(t, t === tokenToShow ? 100 : 0);
}
}
function fmtTempC(v) {
// keep it clean for UI: 14°C / 23°C etc.
const n = Math.round(Number(v));
return `${n}°C`;
}
// ----------------------------
// Open-Meteo fetch
// ----------------------------
async function fetchWeather({ lat, lon }) {
const url =
`https://api.open-meteo.com/v1/forecast` +
`?latitude=${encodeURIComponent(lat)}` +
`&longitude=${encodeURIComponent(lon)}` +
`¤t=temperature_2m,weather_code,is_day` +
`&timezone=auto`;
const res = await fetch(url);
const json = await res.json();
const cur = json.current || {};
return {
temperature: cur.temperature_2m,
code: cur.weather_code,
isDay: Boolean(cur.is_day),
time: cur.time,
tz: json.timezone,
};
}
// ----------------------------
// Main update flow
// ----------------------------
let selectedIndex = 0;
async function updateForCity(index) {
selectedIndex = index;
const city = CITIES[index];
applyRandomTheme();
setText(TOKENS.city, city.name);
status.textContent = `Loading ${city.name}…`;
const w = await fetchWeather(city);
setText(TOKENS.temperature, fmtTempC(w.temperature));
setText(TOKENS.atmosphere, codeToAtmosphere(w.code));
showOnlyIcon(codeToIcon(w.code, w.isDay));
status.textContent = `Updated: ${w.time || "—"} (${w.tz || "—"})`;
}
// ----------------------------
// UI events + auto refresh
// ----------------------------
select.value = "0";
select.addEventListener("change", () => updateForCity(Number(select.value)));
refreshBtn.addEventListener("click", () => updateForCity(selectedIndex));
// First paint: start at Taipei (index 0)
player.addEventListener("load", () => {
updateForCity(0);
// Optional: refresh every 10 minutes
setInterval(() => updateForCity(selectedIndex), 10 * 60 * 1000);
});
```
Pasting that into the JS panel in Codepen (after adding my Asset CDN link to the HTLM) resulted in the working demo at the top of the article.
Here’s the code from the output:
```jsx
import { DotLottie } from "https://esm.sh/@lottiefiles/dotlottie-web@latest";
// ----------------------------
// Tokens in your animation
// ----------------------------
const TOKENS = {
city: "city",
temperature: "temperature",
atmosphere: "atmosphere",
iconSun: "icon-sun",
iconCloudy: "icon-cloudy",
iconWind: "icon-wind",
iconRain: "icon-rain",
iconStorm: "icon-storm",
iconSnow: "icon-snow",
iconSnowstorm: "icon-snowstorm",
iconNight: "icon-night",
};
const ICON_TOKENS = [
TOKENS.iconSun,
TOKENS.iconCloudy,
TOKENS.iconWind,
TOKENS.iconRain,
TOKENS.iconStorm,
TOKENS.iconSnow,
TOKENS.iconSnowstorm,
TOKENS.iconNight,
];
// ----------------------------
// City presets (8 options)
// ----------------------------
const CITIES = [
{ name: "Taipei", lat: 25.0330, lon: 121.5654 },
{ name: "Tokyo", lat: 35.6762, lon: 139.6503 },
{ name: "Seoul", lat: 37.5665, lon: 126.9780 },
{ name: "Singapore", lat: 1.3521, lon: 103.8198 },
{ name: "Sydney", lat: -33.8688, lon: 151.2093 },
{ name: "London", lat: 51.5074, lon: -0.1278 },
{ name: "New York", lat: 40.7128, lon: -74.0060 },
{ name: "San Francisco", lat: 37.7749, lon: -122.4194 },
];
// ----------------------------
// Open-Meteo mapping helpers (your provided logic)
// ----------------------------
function codeToAtmosphere(code) {
if (code === 0) return "Clear";
if (code <= 2) return "Cloudy";
if (code === 3) return "Overcast";
if (code === 45 || code === 48) return "Fog";
if (code >= 51 && code <= 67) return "Rain";
if (code >= 71 && code <= 77) return "Snow";
if (code >= 80 && code <= 82) return "Rain";
if (code >= 85 && code <= 86) return "Snow";
if (code >= 95) return "Storm";
return "Weather";
}
function codeToIcon(code, isDay) {
if (!isDay && code <= 3) return TOKENS.iconNight;
if (code === 0) return TOKENS.iconSun;
if (code <= 3) return TOKENS.iconCloudy;
if (code === 45 || code === 48) return TOKENS.iconWind;
if (code >= 51 && code <= 82) return TOKENS.iconRain;
if (code >= 71 && code <= 77) return TOKENS.iconSnow;
if (code >= 85 && code <= 86) return TOKENS.iconSnowstorm;
if (code >= 95) return TOKENS.iconStorm;
return TOKENS.iconCloudy;
}
// ----------------------------
// dotLottie setup
// ----------------------------
const canvas = document.getElementById("dotLottie-canvas");
const SRC = canvas.dataset.src;
const player = new DotLottie({
canvas,
src: SRC,
autoplay: true,
loop: true,
renderConfig: { autoResize: true },
});
// ----------------------------
// UI
// ----------------------------
const ui = document.createElement("div");
ui.style.display = "grid";
ui.style.gap = "10px";
ui.style.marginBottom = "12px";
ui.style.fontFamily = "system-ui, -apple-system, Segoe UI, Roboto, Arial";
ui.style.color = "#fff";
ui.style.width = "320px";
const row = document.createElement("div");
row.style.display = "grid";
row.style.gridTemplateColumns = "1fr auto";
row.style.gap = "10px";
row.style.alignItems = "center";
const select = document.createElement("select");
select.style.padding = "8px 10px";
select.style.borderRadius = "10px";
select.style.border = "1px solid rgba(255,255,255,0.2)";
select.style.background = "rgba(255,255,255,0.08)";
select.style.color = "#fff";
select.style.outline = "none";
CITIES.forEach((c, idx) => {
const opt = document.createElement("option");
opt.value = String(idx);
opt.textContent = c.name;
select.appendChild(opt);
});
const refreshBtn = document.createElement("button");
refreshBtn.textContent = "Refresh";
refreshBtn.style.padding = "8px 12px";
refreshBtn.style.borderRadius = "10px";
refreshBtn.style.border = "1px solid rgba(255,255,255,0.2)";
refreshBtn.style.background = "rgba(255,255,255,0.10)";
refreshBtn.style.color = "#fff";
refreshBtn.style.cursor = "pointer";
const status = document.createElement("div");
status.style.fontSize = "12px";
status.style.opacity = "0.85";
status.textContent = "—";
row.appendChild(select);
row.appendChild(refreshBtn);
ui.appendChild(row);
ui.appendChild(status);
// Insert UI above the canvas
canvas.parentNode.insertBefore(ui, canvas);
// ----------------------------
// Theme picking (random embedded theme each city update)
// ----------------------------
function pickRandomThemeId() {
const themes = player?.manifest?.themes || [];
if (!themes.length) return null;
const t = themes[Math.floor(Math.random() * themes.length)];
return t?.id || null;
}
function applyRandomTheme() {
const themeId = pickRandomThemeId();
if (!themeId) return;
// dotlottie-web has varied theme APIs across versions;
// try the common ones.
if (typeof player.setTheme === "function") player.setTheme(themeId);
else if (typeof player.loadTheme === "function") player.loadTheme(themeId);
else if (typeof player.setThemeId === "function") player.setThemeId(themeId);
}
// ----------------------------
// Token writers
// ----------------------------
function setText(token, text) {
player.setTextSlot(token, { t: String(text) }); // partial update: only change content
}
function showOnlyIcon(tokenToShow) {
for (const t of ICON_TOKENS) {
player.setScalarSlot(t, t === tokenToShow ? 100 : 0);
}
}
function fmtTempC(v) {
// keep it clean for UI: 14°C / 23°C etc.
const n = Math.round(Number(v));
return `${n}°C`;
}
// ----------------------------
// Open-Meteo fetch
// ----------------------------
async function fetchWeather({ lat, lon }) {
const url =
`https://api.open-meteo.com/v1/forecast` +
`?latitude=${encodeURIComponent(lat)}` +
`&longitude=${encodeURIComponent(lon)}` +
`¤t=temperature_2m,weather_code,is_day` +
`&timezone=auto`;
const res = await fetch(url);
const json = await res.json();
const cur = json.current || {};
return {
temperature: cur.temperature_2m,
code: cur.weather_code,
isDay: Boolean(cur.is_day),
time: cur.time,
tz: json.timezone,
};
}
// ----------------------------
// Main update flow
// ----------------------------
let selectedIndex = 0;
async function updateForCity(index) {
selectedIndex = index;
const city = CITIES[index];
applyRandomTheme();
setText(TOKENS.city, city.name);
status.textContent = `Loading ${city.name}…`;
const w = await fetchWeather(city);
setText(TOKENS.temperature, fmtTempC(w.temperature));
setText(TOKENS.atmosphere, codeToAtmosphere(w.code));
showOnlyIcon(codeToIcon(w.code, w.isDay));
status.textContent = `Updated: ${w.time || "—"} (${w.tz || "—"})`;
}
// ----------------------------
// UI events + auto refresh
// ----------------------------
select.value = "0";
select.addEventListener("change", () => updateForCity(Number(select.value)));
refreshBtn.addEventListener("click", () => updateForCity(selectedIndex));
// First paint: start at Taipei (index 0)
player.addEventListener("load", () => {
updateForCity(0);
// Optional: refresh every 10 minutes
setInterval(() => updateForCity(selectedIndex), 10 * 60 * 1000);
});
```
Pasting that into the JS panel in Codepen (after adding my Asset CDN link to the HTLM) resulted in the working demo at the top of the article.
 This prompt actually worked on the first try. Sometimes it takes a few tries, but if your prompt is descriptive and your file is constructed well, then it should be able to get you pretty far.