Beginner Guide: Making an Interactive Button
A State Machine is like a traffic controller for your animations: it decides what happens next based on user input or conditions. Let’s build one together, step by step, using a button hover + click as our running example.
You can remix the file for this example here: https://lottie.link/interbutton
🎨 Step 1: Prepare Your Animation
Before we even touch State Machines, we need an animation to work with.
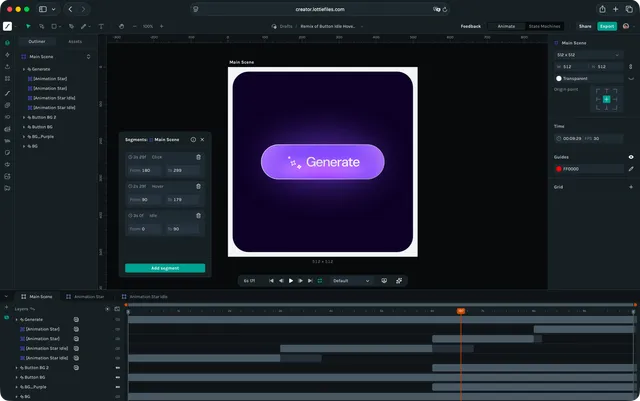
Draw the button.
Add keyframes for the different interactions:
One area for hovering.
Another for pressing/clicking.
Add segments that cover those keyframe areas.
Hit ▶️ Play to preview what happens in each segment.
Rename them something clear, like Idle, Hover, and Click.
In our example, Idle covers frames 0-90, Hover covers 90-179, and Click covers 180-299.
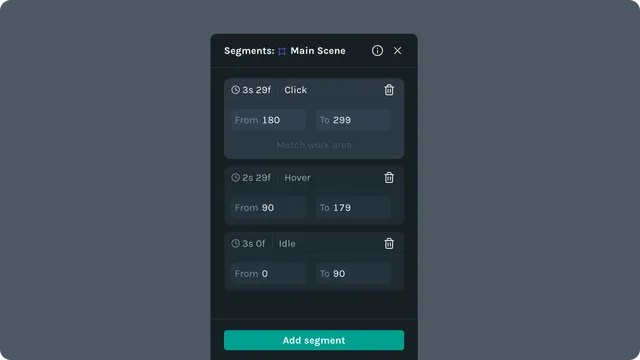
👉 At this point, you should have a button with labeled segments that look like mini “clips” of behavior.
🟢 Step 2: Add States
Open the State Machines tab.
At the bottom-left, you’ll see your named segments.
Drag them onto the State Machine canvas (where your Timeline used to be).
Now, each segment is its own State.
Example: Drag in Idle, Hover, and Click.
These are the building blocks of your logic.

🗝️ Step 3: Define Inputs (Your Variables)
Inputs are the “knobs and switches” that tell your State Machine what’s happening. Let’s make some:
Create an input named “Hovering”.
Make sure it is set to “Boolean”.
Make another Boolean input named “Clicking”.
It is also common to name booleans “is____” such as “isHovering” or “isClicking”. That way the true/false nature of the boolean is clearer.
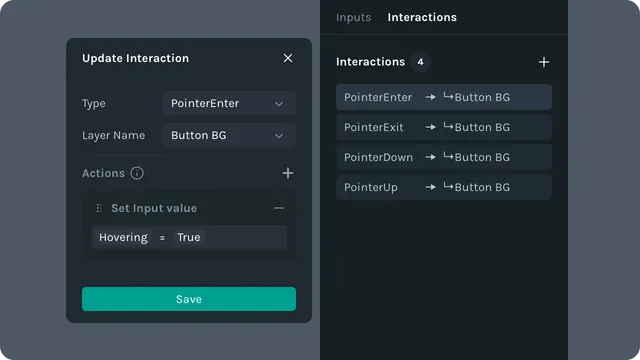
🖱️ Step 4: Create Interactions (User Actions)
Interactions update your Inputs based on what the user does.
For our button:
When the mouse enters the button area → set
Hovering = true.When the mouse leaves → set
Hovering = false.When the mouse clicks → set
Clicking = true.When the mouse releases the click → set
Clicking = false.
Let’s set that up now:
Create a new Interaction.
Select ‘PointerEnter’ as the User Action, and select your button layer as the Target Layer.
Add a new Action and select “Set Input”.
Choose “Hovering” as the input, and set it to ‘true’.
Now when the mouse pointer enters the button’s layer area, the Hovering input will switch to true.
Create three more Interactions:
PointerExit, set Hovering to false
PointerDown, set Clicking to true
PointerUp, set Clicking to false
And with that, your Interactions and Inputs are all set!
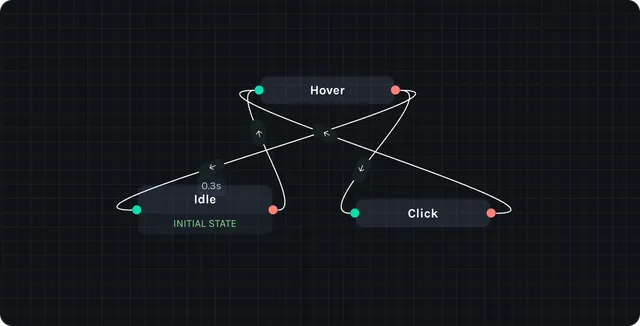
🔗 Step 5: Connect States with Transitions
Now it’s time to wire everything together.
Each state has:
Green side = Input
Red side = Output
Drag a wire from one state’s output to another’s input.
In our case, we will want to draw a transition from Idle to Hover and then Hover to Click. But we also cannot forget the return journey of Click to Hover and then Hover to Idle.
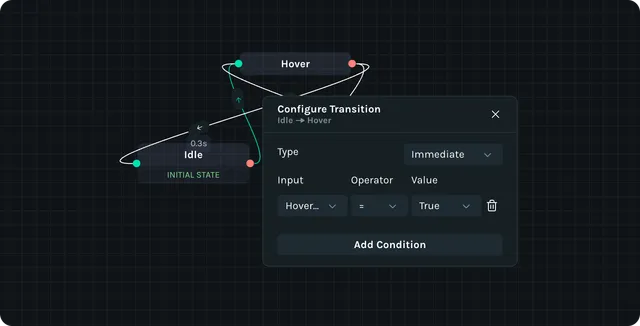
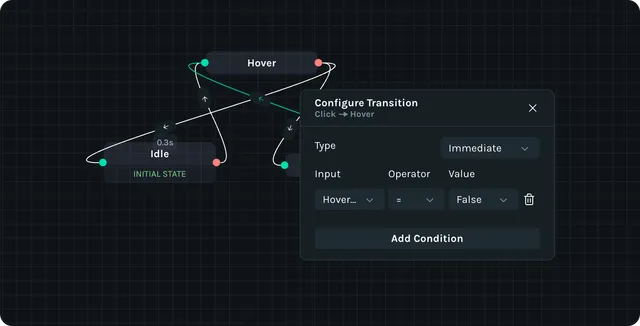
Set up Conditions for your Transitions.
From Idle → Hover: only allow if
Hovering = true.From Hover → Click: only allow if
Clicking = true.From Click → Hover: only allow if
Clicking = false.From Hover → Idle: only allow if
Hovering = false.
👉 This way, your button feels responsive and natural:
Hover over it → it lights up.
Click it → it plays the click animation.
Move away → it resets back to Idle.
🎉 Recap
By following these steps, you’ve built a simple but powerful State Machine:
🎨 Prepare segments (Idle, Hover, Click).
🟢 Add states to the canvas.
🗝️ Define inputs (Hovering, Clicking, etc.).
🖱️ Set interactions (mouse enters, clicks, leaves).
🔗 Wire transitions with conditions.
You’ve now got a button that thinks for itself!