Intermediate Guide: Making a Timed Traffic Signal
In this guide we will create a traffic signal state machine to focus on using Numeric inputs as a clock to get a timer effect. The traffic signal will switch between Green, Yellow, and Red depending on the amount of time that has passed.
You can remix the file for this example here: https://lottie.link/traffic\
🎨 Step 1: Prepare Your Animation
First, design your traffic light visuals and define the segments that represent each light.
Draw your traffic light with three segments:
Green light ON
Yellow light ON
Red light ON
Use keyframes to animate the switch between lights (if needed).
Add segments for each state using markers.
Red: 0-30
Green: frames 62-92
Yellow: 31-61
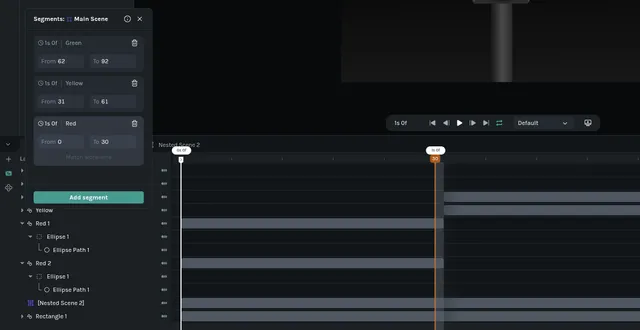
✅ At this point, you've got three labeled segments—each a snapshot of the traffic light's current state.
You will notice that these frames are very specific, and in fact they are each 30 frames. This is because our animation plays at 30 frames per second, meaning each segment is exactly one second long. This concept will be the foundation of our timer. We can store a value of how many times we have looped a segment to know how many seconds have passed.
🟢 Step 2: Add States to the State Machine
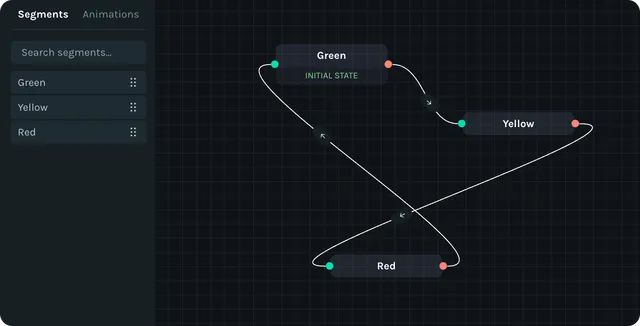
Open the State Machines tab.
Drag each segment (Green, Yellow, Red) onto the State Machine canvas.
Now you've got three state nodes, ready to be connected!
💡 Tip: Set Green as your Initial state (right-click the node → Set as Initial).
🕰️ Step 3: Create Timer Inputs
Our transitions will be based on time delays — so we need one input to act as a timer.
Add a Numeric input named elapsedTime.
This will represent how many seconds have passed since entering a state.
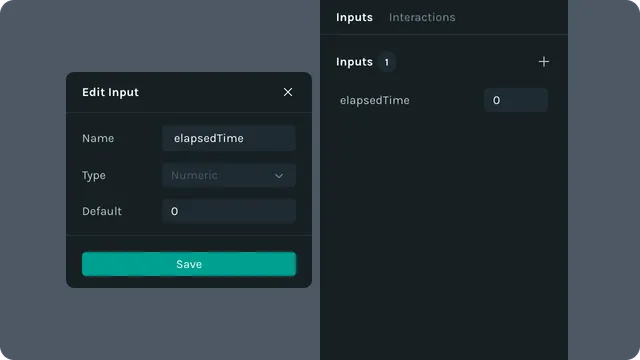
You can update this timer through actions on each state (we'll do that next).
🧠 Step 4: Add Entry Actions (Reset Timer)
When each state begins, we want to reset the elapsedTime value to 0.
For each state:
Select the state (Green, Yellow, or Red)
In Entry Actions, add:
Set elapsedTime = 0
This means that when the state begins (we enter the state), it will change elapsedTime to 0 before doing anything else. This ensures the timer starts fresh each time a new light turns on.
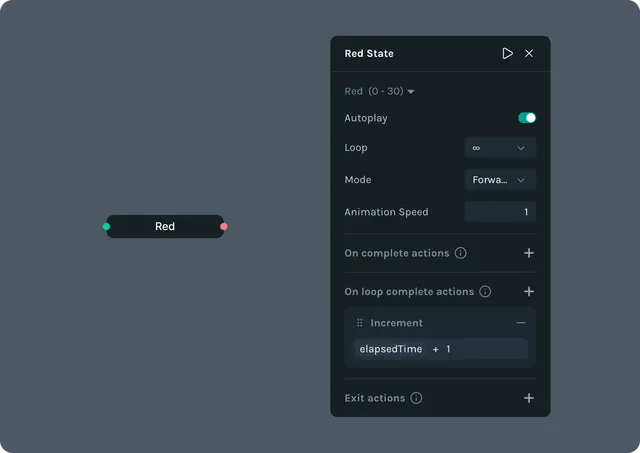
⚙️ Step 5: Add On Loop Complete Actions (Increment Timer)
After each loop of a state, we want to add one to the elapsedTime.
For each state:
Select the state (Green, Yellow, or Red)
Set Loop to infinity. This ensures that it will loop over and over.
In On loop complete actions, add:
Increment elapsedTime + 1.
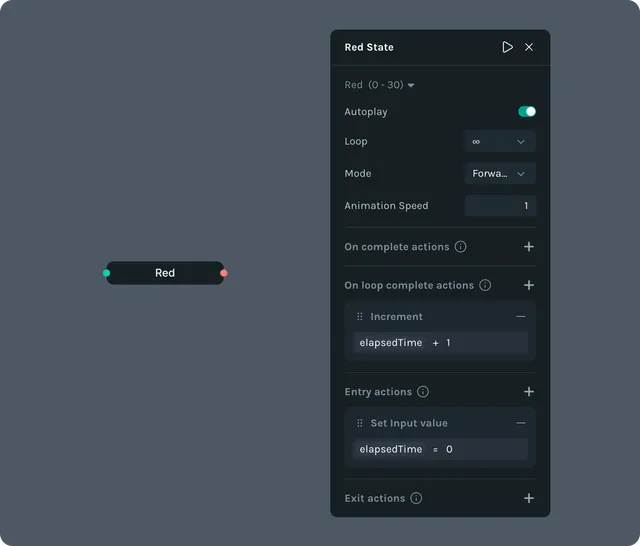
This means that when the loop completes, the elapsedTime counter will increment by one, corresponding to the number of seconds since entering the state.
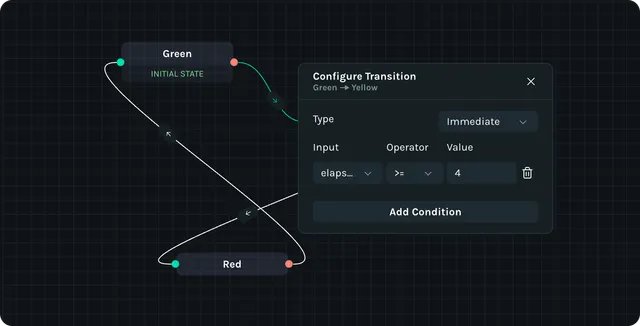
🔁 Step 6: Create Transitions Between States
Now connect the states in a loop:
Drag a wire:
Green → Yellow
Yellow → Red
Red → Green
Set transition conditions based on elapsedTime:
Green → Yellow: elapsedTime ≥ 4
Yellow → Red: elapsedTime ≥ 1
Red → Green: elapsedTime ≥ 5
This means:
Stay on green for 4 seconds
Yellow for 1 second
Red for 5 seconds
▶️ Step 7: Test the Loop
Head to the Player and toggle the State Machine view.
You should see the traffic light automatically:
Start on Green
Switch to Yellow after 4 seconds
Then to Red after 1
Back to Green after 5
🌟 You just created a timed animation loop with zero code!
🎉 Recap
Here's what you built:
🎨 Defined segments: Green, Yellow, Red
🟢 Dragged them as States
🕰️ Added an elapsedTime input
⚙️ Set entry and update actions
🔗 Connected transitions with time-based conditions
This simple setup can be reused for countdowns, idle animations, and anything that changes based on time.