Beginner Guide Birthday Cake
This is a short tutorial for creating the Birthday Cake example.
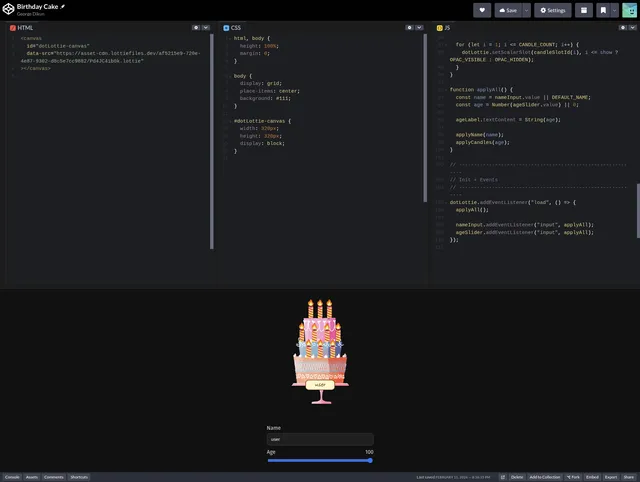
You can access the Codepen example here: https://codepen.io/George-Dikun/pen/JoKmQjV
Creating the File
Before you begin using your motion tokens in code, you first need to create a file that uses motion tokens.
Here is the remix link of the birthday cake animation in Lottie Creator: https://lottie.link/cake
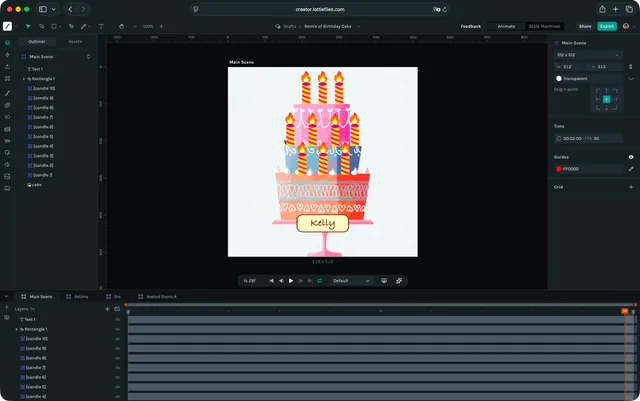
Once inside Creator, you can see the current tokens by opening the Motion Tokens manager.
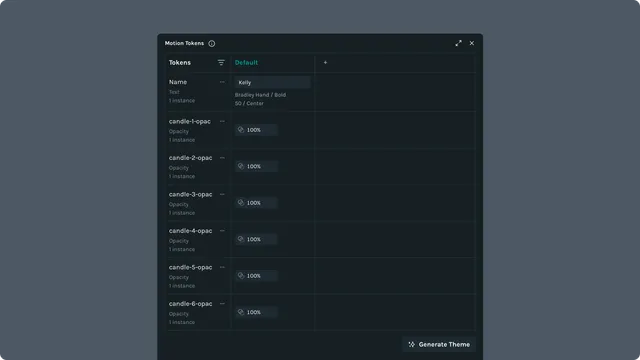
Here you can find the text token called Name. It simply decides what text should be displayed on the cake. It is “Kelly” by default.
Also in the manager, you’ll see that there are several tokens named candle-[x]-opac where [x] is a number. This number corresponds to the respective candle. For instance, [candle 8] has the token candle-8-opac attached to its opacity property.
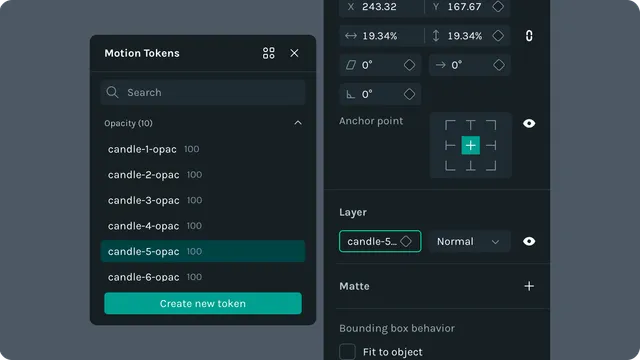
This is a clever solution for selectively choosing which candles to show. Later on, the code can count from 0-10 and make the opacity 100% for the matching candles. So if the age is 30, then our code can “turn on” candles 1, 2, and 3 by making them visible. This technique of using opacity to toggle specific layers is very useful and has lots of applications.
For this project, that’s actually all the setup necessary on the design side. Next we will focus on how to get it working in Codepen and ultimately in your project.
Vibe Coding with ChatGPT
The logic involved with this project is actually pretty straightforward for someone who understands code. For those who don’t, it is a trivial task for AI.
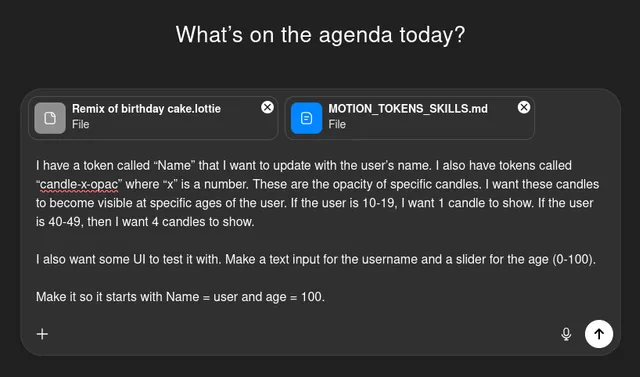
The prompt we used was:
Prompt
I have a token called “Name” that I want to update with the user’s name. I also have tokens called “candle-x-opac” where “x” is a number. These are the opacity of specific candles. I want these candles to become visible at specific ages of the user. If the user is 10-19, I want 1 candle to show. If the user is 40-49, then I want 4 candles to show.
I also want some UI to test it with. Make a text input for the username and a slider for the age (0-100).
Make it so it starts with Name = user and age = 100.
Make sure to include the dotLottie file and the skills document!
Here’s the code from the output:
import { DotLottie } from "https://esm.sh/@lottiefiles/dotlottie-web@latest";

// ------------------------------------------------------------
// Defaults
// ------------------------------------------------------------
const DEFAULT_NAME = "user";
const DEFAULT_AGE = 100;

// If your file has more/less candles, change this:
const CANDLE_COUNT = 10;

// Opacity values: adjust if your authored slots expect 0..1 instead of 0..100
const OPAC_VISIBLE = 100;
const OPAC_HIDDEN = 0;

// Slot IDs
const NAME_SLOT = "Name"; // text slot
const candleSlotId = (i) => `candle-${i}-opac`; // scalar slots

// ------------------------------------------------------------
// Canvas + Player
// ------------------------------------------------------------
const canvas = document.getElementById("dotLottie-canvas");
const SRC = canvas.dataset.src;

const dotLottie = new DotLottie({
  canvas,
  src: SRC,
  autoplay: true,
  loop: true,
  renderConfig: { autoResize: true },
});

// ------------------------------------------------------------
// UI
// ------------------------------------------------------------
const ui = document.createElement("div");
ui.style.display = "grid";
ui.style.gap = "10px";
ui.style.marginTop = "14px";
ui.style.width = "320px";
ui.style.fontFamily = "system-ui, -apple-system, Segoe UI, Roboto, Helvetica, Arial, sans-serif";
ui.style.color = "#fff";

ui.innerHTML = `
  <label style="display:grid; gap:6px;">
    <span style="opacity:.85;">Name</span>
    <input id="ui-name" type="text" value="${DEFAULT_NAME}"
      style="padding:10px 12px; border-radius:10px; border:1px solid rgba(255,255,255,.15);
             background: rgba(255,255,255,.06); color:#fff; outline:none;" />
  </label>

  <label style="display:grid; gap:6px;">
    <div style="display:flex; justify-content:space-between; align-items:baseline;">
      <span style="opacity:.85;">Age</span>
      <span id="ui-age-label" style="opacity:.85;">${DEFAULT_AGE}</span>
    </div>

    <input id="ui-age" type="range" min="0" max="100" step="1" value="${DEFAULT_AGE}" />
  </label>
`;

canvas.insertAdjacentElement("afterend", ui);

const nameInput = document.getElementById("ui-name");
const ageSlider = document.getElementById("ui-age");
const ageLabel = document.getElementById("ui-age-label");

// ------------------------------------------------------------
// Logic
// ------------------------------------------------------------
function decadeCandleCount(age) {
  // 0–9 => 0, 10–19 => 1, ... 100 => 10
  const n = Math.floor(age / 10);
  return Math.max(0, Math.min(CANDLE_COUNT, n));
}

function applyName(name) {
  // Partial update: only text content
  dotLottie.setTextSlot(NAME_SLOT, { t: name });
}

function applyCandles(age) {
  const show = decadeCandleCount(age);

  for (let i = 1; i <= CANDLE_COUNT; i++) {
    dotLottie.setScalarSlot(candleSlotId(i), i <= show ? OPAC_VISIBLE : OPAC_HIDDEN);
  }
}

function applyAll() {
  const name = nameInput.value || DEFAULT_NAME;
  const age = Number(ageSlider.value) || 0;

  ageLabel.textContent = String(age);

  applyName(name);
  applyCandles(age);
}

// ------------------------------------------------------------
// Init + Events
// ------------------------------------------------------------
dotLottie.addEventListener("load", () => {
  applyAll();

  nameInput.addEventListener("input", applyAll);
  ageSlider.addEventListener("input", applyAll);
});
Pasting that into the JS panel in Codepen (after adding my Asset CDN link to the HTLM) resulted in the working demo at the top of the article.
Sometimes it takes a few tries, but if your prompt is descriptive and your file is constructed well, then it should be able to get you pretty far. This prompt didn’t completely work on the first try, but I just re-ran it and it gave me a perfect result. You can also just tell the LLM which part isn’t working and it will often fix it on the next try.