Timeline
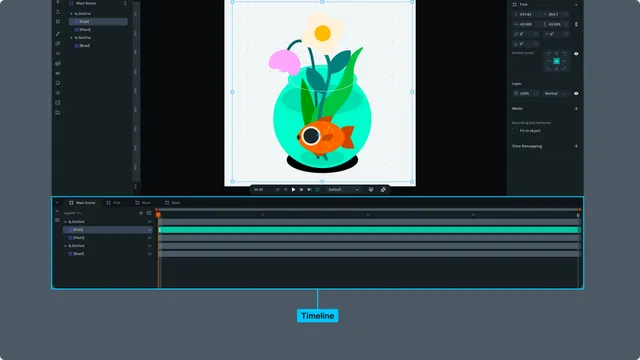
The Timeline is the control center for your animations in Lottie Creator. It displays your layers, keyframes, and provides tools for controlling playback and timing.
Timeline Interface
The Timeline is located at the bottom of the Lottie Creator interface and consists of several key areas:
Layout Structure
┌─────────────┬─────────────────────────────────────────────┐
│             │         Time Scale (seconds)                │
│   Layer     ├─────────────────────────────────────────────┤
│   Sidebar   │                                             │
│             │         Keyframe Panel                      │
│   (36px)    │    (Layer rows with keyframes)              │
│             │                                             │
└─────────────┴─────────────────────────────────────────────┘
Timeline Components
1. Layer Sidebar (Left)
- •Scene management controls
- •Segment controls
- •Layer visibility toggles
- •Lock/unlock layer controls
2. Layer Panel (Center-Left)
- •Layer names and hierarchy
- •Expandable/collapsible layer tree
- •Property tracks nested under layers
- •Tree lines showing parent-child relationships
- •Toggle between "Source" and "Layers" view
3. Time Scale (Top)
- •Slider allows zooming and traversing the timeline
- •Shows seconds with frame subdivisions
- •Dynamic tick marks based on zoom level
4. Keyframe Panel (Center-Right)
- •Visual representation of keyframes as diamonds
- •Orange playhead (scrubber) indicator
- •Draggable keyframes
Playhead and Scrubbing
The playhead (also called scrubber) is the orange vertical line indicating the current frame.
Using the Playhead
Move Playhead:
- •Click on time scale to jump to that frame
- •Drag the orange playhead handle
- •
Keyboard shortcuts for precise navigation:
- •
Home- Jump to first frame (0) - •
End- Jump to last frame - •
Page Down- Next frame - •
Page Up- Previous frame - •
Shift + Page Down- Forward 10 frames - •
Shift + Page Up- Back 10 frames
- •
Scrubbing Features:
- •Shift + Drag playhead - Snaps to visible keyframes
- •Frame number display - Shows current frame while dragging
- •Frame width highlighting - Visual feedback when zoomed in
Jump to Keyframes
Navigate between keyframes efficiently:
Shortcuts:
- •J - Jump to previous keyframe
- •L - Jump to next keyframe
Works across all layers and properties, finding the nearest keyframe in either direction.
Playback Controls
Control animation playback directly from the timeline or preview panel.
Play/Pause
Toggle Playback:
- •Press Space to play/pause
- •Click play button in preview controls
Playback Behavior:
- •Plays from current playhead position
- •Respects work area boundaries (loops within work area)
- •Maintains consistent frame rate (default 30 FPS)
- •Automatically pauses at end (unless looping)
Loop Mode
Enable Looping:
- •Toggle loop button in preview controls
- •When enabled, playback returns to work area start upon reaching end
- •Works with both full timeline and work area ranges
Work Area
The work area defines a specific range of your timeline for focused playback and export.
Setting Work Area
Visual Indicator:
- •Adjustable start and end sliders
- •Drag sliders to set range
Keyboard Shortcuts:
- •
Cmd/Ctrl + Opt/Alt + [- Set work area start to playhead - •
Cmd/Ctrl + Opt/Alt + ]- Set work area end to playhead
Manual Setting:
- •Alt + Drag on time scale to shift work area
- •Drag start/end handles to adjust
Work Area Operations
Context Menu Options: Right-click on work area for operations:
- •Set as Segment - Save range as named segment
- •Trim Scene to Work Area - Cut timeline to work area range
- •Reset Work Area - Remove work area limits
Using Work Area:
- •Limits playback to specified range
- •Useful for previewing specific sections
- •Can create multiple segments from different work areas
Timeline Zoom and Pan
Control timeline visibility to work efficiently at different scales.
Zooming the Timeline
Zoom in to fine-tune keyframe spacing, or zoom out for a full view of your animation's timing.
Methods:
- •
Cmd/Ctrl + +— Zoom in (more detail, fewer frames visible) - •
Cmd/Ctrl + -— Zoom out (less detail, more frames visible) - •Scroll wheel while hovering over the time scale — zoom centered on cursor position
- •Pinch gesture on trackpad — zoom in and out
- •
Drag the zoom slider on the time scale — drag the ends of the slider to zoom, drag the middle to pan
Zoom behavior: Zooming is centered around the current playhead position, so your point of focus stays in view as you zoom in or out.
Panning the Timeline
Horizontal Scrolling:
- •Drag the scrollbar below the keyframe panel
- •Two-finger swipe horizontally on trackpad
- •Middle-click + drag on the keyframe panel
- •Drag the middle of the zoom slider on the time scale
Layer Rows and Hierarchy
The timeline displays layers in hierarchical rows.
Layer Display
Hierarchy Visualization:
- •Tree lines connect parent and child layers
- •Indentation shows nesting level
- •Expand/collapse to show/hide child layers and properties
Expanding Layers:
- •Click arrow next to layer name
- •Arrow keys to expand/collapse selected layer
- •Reveals property tracks (Position, Scale, Rotation, etc.)
Property Tracks
When layers are expanded, property tracks appear nested underneath:
Property Track Display:
- •Each animated property gets its own row
- •Property name on left (e.g., "Position", "Opacity")
- •Only animated properties shown by default
- •Expand/collapse properties individually
Frames
Frame Duration:
- •Calculated as
1000 / fpsmilliseconds - •Affects playback timing precision
- •Doesn't change timeline display (always shows seconds)
Scene Controls
The header tabs allow scene navigation.
- •Shows active scene name
- •Click to open scene selector
- •Switch between scenes quickly
Segment Management
Segments:
- •Named ranges of your timeline
- •Create from work area
- •Quick access to specific animation sections
Layer Row Context Menu
Layer Operations:
- •Show/hide layer
- •Lock/unlock layer
- •Rename layer
- •Delete layer
Preview
Quick Preview:
- •Set work area around section of interest
- •Enable loop for repeated viewing
- •Adjust playback speed as needed
Full Animation:
- •Reset work area for full timeline playback
- •Verify overall timing and flow
- •Check transitions between sections