Time Stretch
Time Stretch changes the duration of a nested scene by stretching or compressing its entire timeline. The stretch factor is a percentage of the original duration. 100% is the original length, values above 100% make the scene longer, and values below 100% make it shorter. Every keyframe inside the scene is rescaled proportionally, so the timing relationships between them stay intact.
Unlike retiming individual keyframes, Time Stretch operates on the whole nested scene at once, which is useful when you need a composition to fit a specific duration without re-animating it.
When to Use Time Stretch
- •Fit a nested scene into a longer or shorter time slot
- •Slow down or speed up an entire animation uniformly
- •Match the pacing of a scene to the rest of your project
Applying Time Stretch
Time Stretch is available in the Time Stretch section of the Properties panel.
Select a nested scene in the canvas or timeline. You can find the Time Stretch section in the Properties panel.
Enter a Stretch Factor and press Enter. The change applies to the scene's track immediately.
By default, the scene stretches from its Layer In-point. The start of the scene stays fixed, and the timeline extends or contracts from the end.
Time Stretch Settings
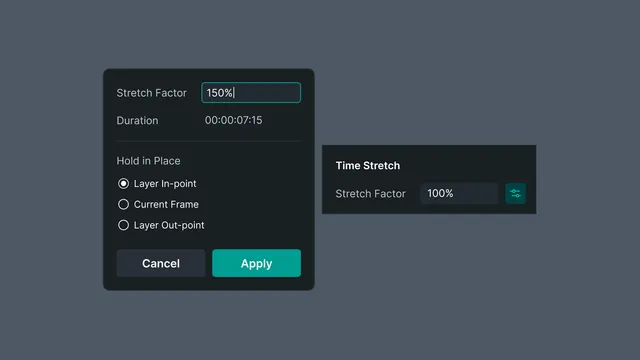
Click the settings button next to the Stretch Factor to open the settings dialog. It shows the selected scene's Duration and lets you change the Hold in Place anchor, which is the point that stays fixed while the rest of the timeline stretches.
Hold in Place
- •
Layer In-point (default): keeps the start of the scene fixed; the timeline extends or contracts from the end.
- •Current Frame: keeps the playhead's current frame fixed; the timeline stretches around it.
- •
Layer Out-point: keeps the end of the scene fixed; the timeline extends or contracts from the start.